Recap:
After an extensive refresh including a light weight flywheel , I was not happy with the way the car was driving. It wasn’t the sublime GT sports car it had been, rather it had an old VW Beetle roughness to it.
When I wrote pt. 1, I was confident I had done my research and was on a path to success. The problem had to be the flywheel and clutch causing vibration due to imbalance. There are multiple stories of dynamically balancing the flywheel and clutch to eliminate vibration and noise out on the interweb, mostly on non-Porsche forums to be fair. But from the hit count I was convinced I was the victim of cost reduced materials and manufacturing. All I had to do was take the whole assembly off (again,) take it to a machine shop for correction, reinstall and I’d have the prefect 993. Pt. 2 would be a celebration of my prowess. I write today a humbler, but much wiser person.
First theory: FW/PP needs dynamic balancing
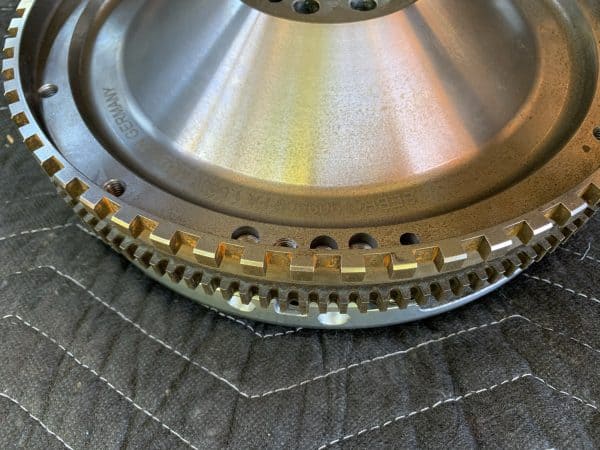
I asked around for a good bay area machine shop and was recommended to Jays by the airport. I delivered the flywheel and pressure plate sans the throw-out bearing bolted together with alignment marks as I had it installed and asked Jay to balance it in this configuration. A week later it was ready and had a bunch of holes drilled in the periphery:
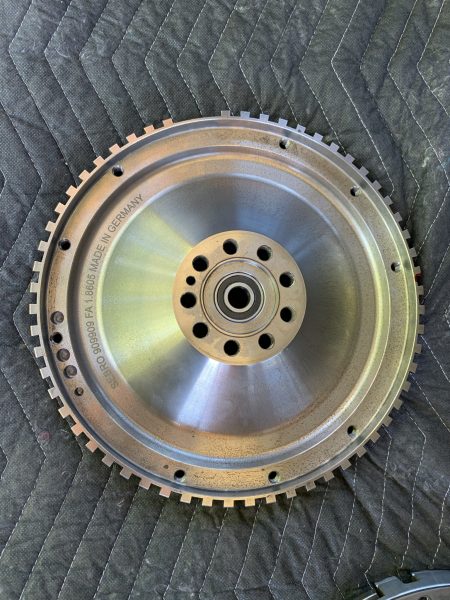

I measured the holes and estimated the mass removed to balance the assembly. I thought it was interesting that all the holes were in same segment on both parts seeing as Jay balanced the FW first and then the FW+PP. Out of the three ways I could have assembled the PP to the FW, I picked the worst. Murphy is a powerful adversary.
Total mass removed accounted for less than 20g at 12cm which on a 5kg FW plus more kg for PP and then even more for crank, conrods and pistons, is less than one quarter of one percent of the rotating mass. Didn’t seem to be a smoking gun but I have no baseline for these numbers, maybe 12cm is a big factor. Let’s put it back on and see.
I guess after a couple of weekends of power tools my sense of NVH shifted but on the test drive and other victory laps, I was convinced I had solved the problem.
However, as pandemic 1.0 waned, I swapped 993-with-LWFW’s with an audiophile buddy of mine who pointed out that something sounded significantly wrong with mine I also noticed that his was sewing-machine smooth to red line and much nicer sounding than mine but tried to put it all down to the fact it was a cabriolet (i.e. denial.)
With my pt 2 deadline to the Prieta Post website well and truly blown, what to do? Back to basics; engineering training kicks in: what’s the problem statement and what facts do we know?
- Side windows fluttered at 2500rpm,
- there was a strong vibration in the back of the seat at 3500rpm
- the run up to red line was unbearably grating.
- Revving the engine in neutral with clutch in or out was just as bad
It had to be part of the rotating engine up to the flywheel & PP but I’d confirmed they were OK, could something go wrong with the engine with all the work that’s been done? The car wasn’t logging any codes so I checked all the plug wires were correct, ran each distributor on its own. Everything agreed with my butt dyno which said the car was running better than it ever had.
Was this what a coupe LWFW setup was like? In the back of my head the voices started, “You screwed up!” “That vibration will trash the engine!” Back to research and more reading on the interweb, I found lots of stories of people putting LWFW on and not complaining of noise or vibration, a few even reporting little to no noise & vibration. It was about here when it dawned on me that maybe there was nothing wrong with the engine/transmission, I’d just put it back in wrong and the engine was touching the chassis at some point.
Second theory: vibration is being coupled into cabin due to drivetrain-chassis contact
A rigorous inspection found clearances all round the transmission and engine tray but at the rear it looked like the engine mounts had sagged and the engine tray was touching the rear chassis. When I jacked the engine up, there was a lot of movement in the mount.

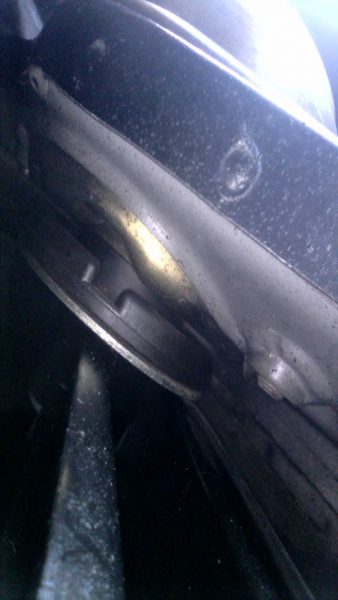
The fastest, lowest cost check was to get some URO RS engine mounts which indeed raised the engine up a good ¼” and now I could get a finger in between the tray and chassis.
Test drive: no change.
At this point there was only one mount left: the transmission mount. Having replaced it once before, I knew it was difficult – this with the engine out. Doing it under the car would be very hard. More reading on the interweb and I find a thread where someone had resolved noise & vibration issues by biasing the transmission to the drivers side (yes, left, I checked) when torquing the subframe bolts. Noting that this was for a tiptronic I figured it’s easier than replacing the mount and I had nothing to lose but another afternoon under my 993.
Third theory: Front transmission mount is coupling vibration to cabin.
The process was quite simple. Raise the car, remove the undercovers, loosen the 6 crossmember bolts and apply some force (I used a thick stick of the appropriate length as a lever) to the transmission pushing it to the left. Then tighten the 6 bolts, starting on the left and proceeding to the right. Torque the bolts down, replace undercovers and back on the ground.
Test drive: no change.
Fourth Theory: Transmission mount is faulty. First Attempt.
OK, the tranny mount has to come out. How bad can it be. Maybe if I just take the front subframe crossmember out there will be enough room. With amazing proficiency I raised the car, removed the undertrays and gear selector, removed the front subframe crossmember and secured the transmission jack to the transmission. I removed the 6 transmission mount crossmember bolts and slowly lowered the transmission until it contacted the rear subframe crossmember. Was there enough room to get to the transmission mount? My heart sank; we were really putting the Nein back into 993. The bolt hole barely cleared the tunnel and there was no way I was going to get the extractor hardware bolted up.
Fourth Theory: Transmission mount is faulty. Second Attempt.
OK now I’m annoyed. That sucker is coming out whatever collateral damage is necessary. I remove both subframe crossmembers (after first marking the alignment on the eccentrics) and continue lowering the transmission, keeping an eye on the various wires and hoses top and bottom. I was finally able to drop the tranny crossmount enough such that the bolt was below the rear floor panels and I could assemble the extractor tool I had contrived from 2 bearing R&R kits I purchased (the custom tool available online costs the same but now I can swap anything!) After 15 mins of colorful language, wrestling multiple oversized breaker bars at close quarter in a confined space I was able to press the mount out.


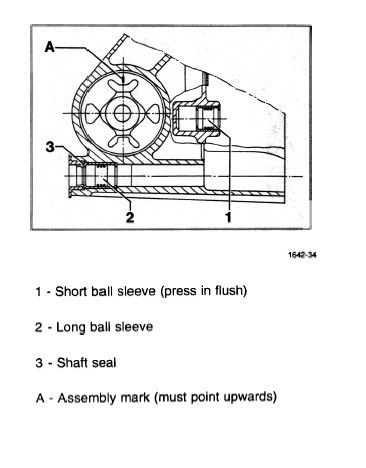
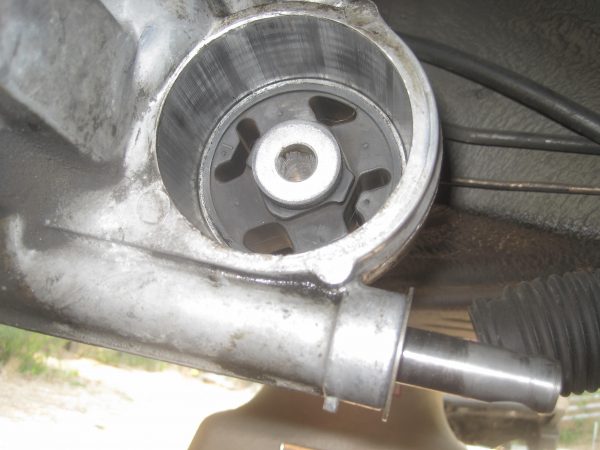
So here was the discovery. The transmission mount has 4 segments securing the inner bolt race to the outer housing; they are not all the same. In searching through the factory manual I found a drawing of the transmission mount and while there was not text about orientation, the picture showed a specific orientation.
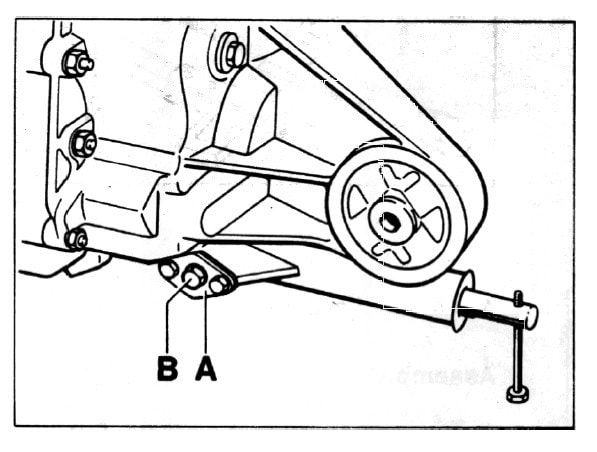
I had previously installed the replacement 90 degrees rotated from the factory as seen in the comparison photos.

For a couple of metal tubes held together with a rubber insert, this has to be one of the more highly designed parts of the Porsche 993. The design team must have run multiple experiments and hours of computer aided simulation getting the shape of the rubber insert just right. You’d think they could have put a friendly “Hoch” in the rubber next to the part number.
It took a few attempts to get it started in the right position even after freezing the mount for a couple of days and 5 mins with a hot air gun on the tranny. Trust me, I checked several times until it was perfect. After everything was bolted on and on the ground I turned the key and immediately heard a difference. Quiet, calm, still, no gear rattle in neutral (oil cold but hey!)- a quantum leap in terms of in noise and vibration, even at idle.
The ensuing test drive was truly magical. No grating noise or resonance, no vibration in the chassis or the seat. Just the smooth whirring of that Mezger mill behind me as I ran through the gears. I arrived back home with as big a grin on my face as the day I brought her home the first time.
I am totally dumbfounded at how much difference this seemingly inconsequential difference made. All the vibration and noise is gone from the cabin and the only sound is the tires on the road, the wind on the windshield and the symphonic whirr behind you. Even the can o’ bolts in neutral with the clutch out is hugely quieted. Only noise that’s left (while attenuated) is that raucousness as you pass through 1800 rpm in 1st that is common for LWF. I really didn’t think a rubber bushing could be so important but there it is – you never stop learning.
My Grand Tourer is back and so it’s time get out from under my 993, fill the tank and get on the road. See you out there!
Postscript:
While searching for diagrams to illustrate this article I subsequently found a drawing in the factory workshop manual that clearly calls out the correct orientation of the mount. Just goes to show that you really should read the fine manual.